Tendermint KMS
Tendermint KMS is a Key Management Service (KMS) that allows separating key management from Tendermint nodes. In addition it provides other advantages such as:
- Improved security and risk management policies
- Unified API and support for various HSM (hardware security modules)
- Double signing protection (software or hardware based)
It is recommended that the KMS service runs in a separate physical hosts. On this page you can learn how to setup a Key Management System for Evmos with our without ledger.
Install Tendermint KMS onto the node
You will need the following prerequisites:
✅ Rust (stable; 1.56+): https://rustup.rs/
✅ C compiler: e.g. gcc, clang
✅ pkg-config
✅ libusb (1.0+). Install instructions for common platforms
✅ Debian/Ubuntu
apt install libusb-1.0-0-dev✅ RedHat/CentOS
yum install libusb1-devel✅ macOS (Homebrew)
brew install libusb
For x86_64 architecture only:
Configure RUSTFLAGS environment variable:
export RUSTFLAGS=-Ctarget-feature=+aes,+ssse3
We are ready to install KMS. There are 2 ways to do this: compile from source or install with Rusts cargo-install. We’ll use the first option.
Compile from source code
The following example adds --features=ledger to enable Ledger support.
tmkms can be compiled directly from the git repository source code, using the following commands:
gh repo clone iqlusioninc/tmkms && cd tmkms
[...]
cargo build --release --features=ledger
Alternatively, substitute --features=yubihsm to enable YubiHSM
support.
If successful, it will produce the tmkms executable located at: ./target/release/tmkms.
Configuration
A KMS can be configured using the following HSMs
YubiHSM
Detailed information on how to setup a KMS with YubiHSM 2 can be found here.
Tendermint KMS + Ledger
Learn how to set up Tendermint KMS with the Tendermint Ledger app.
🚧 The following instructions are a brief walkthrough and not a comprehensive guideline. You should consider and research more about the security implications of activating an external KMS.
🚨IMPORTANT: KMS and Ledger Tendermint app are currently work in progress. Details may vary. Use under your own risk
Prerequisites
Checklist
- Ledger Nano X or Nano S device (compare here)
- Ledger Live installed
- Tendermint app installed (only in
Developer Mode) - Latest Versions (Firmware and Tendermint app)
Tendermint Validator app (for Ledger devices)
You should be able to find the Tendermint app in Ledger Live. You will need to enable Developer Mode in Ledger Live
Settings in order to find the app.
KMS configuration
In this section, we will configure a KMS to use a Ledger device running the Tendermint Validator App.
Config file
You can find other configuration examples here
- Create a
~/.tmkms/tmkms.tomlfile with the following content (use an adequatechain_id)
# Example KMS configuration file
[[validator]]
addr = "tcp://localhost:26658"                  # or "unix:///path/to/socket"
chain_id = "evmos_9001-1"
reconnect = true                                # true is the default
secret_key = "~/.tmkms/secret_connection.key"

[[providers.ledger]]
chain_ids = ["evmos_9001-1"]
- Edit
addrto point to yourevmosdinstance. - Adjust
chain-idto match your.evmosd/config/config.tomlsettings. provider.ledgerhas not additional parameters at the moment, however, it is important that you keep that header to enable the feature.
Plug your Ledger device and open the Tendermint validator app.
Generate secret key
Now you need to generate a secret_key:
tmkms keygen ~/.tmkms/secret_connection.key
Retrieve validator key
The last step is to retrieve the validator key that you will use in evmosd.
Start the KMS:
tmkms start -c ~/.tmkms/tmkms.toml
The output should look similar to:
07:28:24 [INFO] tmkms 0.11.0 starting up...
07:28:24 [INFO] [keyring:ledger:ledger] added validator key evmosvalconspub1zcjduepqy53m39prgp9dz3nz96kaav3el5e0th8ltwcf8cpavqdvpxgr5slsd6wz6f
07:28:24 [INFO] KMS node ID: 1BC12314E2E1C29015B66017A397F170C6ECDE4A
The KMS may complain that it cannot connect to evmosd. That is fine, we will fix it in the next section.
This output indicates the validator key linked to this particular device is: evmosvalconspub1zcjduepqy53m39prgp9dz3nz96kaav3el5e0th8ltwcf8cpavqdvpxgr5slsd6wz6f
Take note of the validator pubkey that appears in your screen. We will use it in the next section.
Evmos configuration
You need to enable KMS access by editing .evmosd/config/config.toml. In this file, modify priv_validator_laddr
to create a listening address/port or a unix socket in evmosd.
For example:
...
# TCP or UNIX socket address for Tendermint to listen on for
# connections from an external PrivValidator process
priv_validator_laddr = "tcp://127.0.0.1:26658"
...
Let's assume that you have set up your validator account and called it kmsval. You can tell evmosd the key that
we've got in the previous section.
evmosd gentx --name kmsval --pubkey <pub_key>
Now start evmosd. You should see that the KMS connects and receives a signature request.
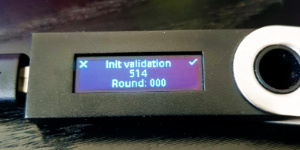
Once the Ledger device receives the first message, it will ask for confirmation that the values are adequate.

Click the right button, if the height and round are correct.
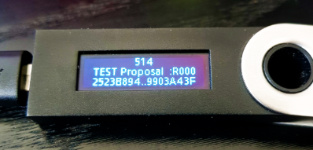
After that, you will see that the KMS will start forwarding all signature requests to the Ledger app:

The word TEST in the second picture, second line appears because they were taken on a pre-release version.
Once the app as been released in Ledger's app store, this word should NOT appear.